Showing posts with label algebra 2. Show all posts

Zombies, Logs, Noticing, Wondering, Precalculus, and #TMC13

I attended the precalculus morning sessions at twitter math camp. Among other things, we made a list of topics that can typically be problematic when teaching precalculus. Then we each signed up to work on one of these topics and produce something useful.

I ended up working on logarithms with Summer (@mathdiva77) and her adorable southern drawl. I am not sure that she would appreciate the adorable adjective, but it's my blog.

We agreed that we both felt pretty comfortable with the procedural part of teaching logs, but we were missing some pizazz. We were missing a hook.

Our fearless leaders, Sam and David, had suggested that we start by trying to focus on our topic's big idea. We decided that logs, being the inverse of exponents, allow us to find an unknown exponent. Check.

So . . . How could we get our students wondering about exponents? We started talking about Max's session on noticing and wondering (one of my favorites!) and then Summer started talking about zombies because they're all the rage right now and we started getting super excited.

Zombies! We needed pictures of zombies! More importantly, we needed pictures of zombies multiplying exponentially. It took some effort to find some classroom appropriate, mild-looking zombies in groups of one, two, four, and eight. We pasted them onto a page in that order.

Then we typed the words "What do you notice?" and "What do you wonder?" at the top of the page and we were done. We basked in the glory of our creation. We envisioned our students noticing the number of zombies and wondering when there would be 1000 zombies, or when zombies would outnumber people. They would be putty in our hands. They would be begging us to tell them about this thing called a logarithm.

Next Sam said that it was time to share what we'd created. At this point I started to have doubts because, hey, did we seriously just paste four pictures into a word document and call that a project? The group offered some helpful suggestions, like attaching the pics to a timeline. We might let our students wonder about that, too, but we would ultimately have to provide that information in order for the questions to be answerable.

The more I think about it, being simple is kind of the beauty of it. Maybe it isn't that hard to bait students to ask the questions we want them to ask. Maybe the chasm between being teacher-centered and student-centered is much smaller than we think. Maybe all you have to do is start with a carefully selected picture, and then get out of the way.

We'll let you know how it goes. Stay tuned.

Unit Circle Philosophy

This year, we decided to expand the number of trig topics we teach in Algebra 2 to include the unit circle, the graphs of sine/cosine, and modeling of periodic motion. These are topics I haven't taught in quite a while, so I am getting to take a fresh look.

Here's how I started out:

1.  Review pre-requisite skills:  Angle measures, trig ratios, special triangles.
2.  Develop the idea of a reference angle.
3.  Given a special angle, draw a triangle in the appropriate quadrant, identify its reference angle, label its sides, and find the values for sine, cosine, and tangent.
4.  Replace old special triangles with new ones where hypotenuse = 1.


5.  Cut out special triangles where the hypotenuse equals one unit. Label their sides and glue them onto a unit circle.


6.  Label the points on the circle. Use the circle to evaluate sine, cosine, and tangent for all the special angles. Look for patterns.
7.  Extend the pattern to the axis angles. Use the circle to evaluate sine, cosine, and tangent for 0, 90, 180, 270.

At this point, I feel like my students have a pretty good conceptual understanding of the unit circle. What now? This is where I am stuck.

I generally don't believe in telling students to just memorize something, but I also cringe when I see a calculus student reach for their calculator when they encounter something like sin pi/2 or tan 3pi/4. 

Don't students need to be able to recall these values later on without a circle or a table in front of them?

What is the best way to tell them to remember these?

I did some searching and I decided on a mnemonic device. 

I am sort of ashamed to be using it.

So far, it is working.

My next post will be the procedure I decided to use, but I am wondering if anyone has any thoughts on memorization and the unit circle? How do you approach this in your classroom?

Write Your Own Word Problem. Also: Why Am I Doing This?

My Algebra 2 students are working on some word problems that set up as systems. They are finding out how many of each type of ticket was sold for the homecoming dance or how many quarters and dimes make $3.45 -- that type of thing.

I thought that students would better understand the process if they wrote their own problem, so I wrote up the sheet below. In the interest of spending less time at the front of the room blah-blah-ing away, I wrote it so that students can read the instructions and work through the process on their own. They start with a problem we've already solved, and replace its parts one at a time. They will illustrate and solve the problem when they are done.

Write Your Own WP

Here's my reflection:

Students seemed to really enjoy this activity. They all dug in and did it. I just walked around and answered a few questions here and there. I also asked each student to check in with me at a couple of different points to make sure they were on track. When they finished, they were just tickled that their problem worked out as planned. In the end, they were more confident about these problems.

I like this activity, I really do. But . . .

I am really wondering if it makes sense to keep doing these types of problems this way, or at all.  The whole process is quite hand hold-y. Students are really just learning to follow a procedure here. I am sure there is a better way to teach systems. Keep the old-school word problems, or ditch them? Replace them with what?

Conclusion: Today I accomplished exactly what I tried to accomplish. However, I am not sure if what I am accomplishing is what I really want to/should accomplish.

PIeces (Final) Project

Students at our school can opt out of second semester final exams by doing well on state assessments. Most of my students fall into that category. Given the choice to take finals or get out of school two days early, you can imagine what most high school students will choose. With no exams, trying to convince students to review at the end of the year is next to impossible.

A few years ago, I switched to a final project instead:  Create a picture using parent functions (and/or conics) and their transformations along with restricted domains or ranges. I like how it encompasses so many things we have learned this year. Review, without looking at all like a painful study guide.

Leading up to this project, I do a week-long mini-unit reviewing all the different types of graphs we've studied this year -- linear, absolute value, quadratic, exponential, rational, polynomial, and conics. We work on their transformations, and then add in restricted domains and ranges. We sketch simple piecewise functions using known functions, and then more complex ones using a graphing calculator.

At the end of the unit, they do this outline of Texas using a graphing calculator.  (I wish I knew where this came from. Someone gave it to me and it became the inspiration for this project).

Now students are primed to make their own picture.

Here are the project requirements, rubric, and final product sheet.

Some questions/discussions that come naturally out of this activity:  How do I make the vertex of x^2 hit the point (5, 2)? How do I make x^2 skinnier? How to I find where this straight line intersects this parabola?  How do I restrict this domain/range to get half of the ellipse?  And (yikes!) how do I write the equation for this straight line?

Here are a few student samples from a previous year. I loved the penguin!


I've received a few projects already this year that are okay. Students are looking for ways to keep it as simple as possible and still meet all the requirements. I am not disappointed, really. They are doing exactly what I have asked them to do. For next time, I think I will edit the project a bit to require that more variety in graph selection be used.

Over all, it isn't a bad way to end the year. I like that students are still working on math up to the last day. They are being creative and I hear mathy conversations taking place. And I am not pulling my hair out trying to convince anybody to review for an exam they aren't going to take. 

Factoring Woes

My students are doing okay with factoring overall, but it has been a struggle.

This is the graphic organizer I ended up using this year:


Students find it helpful, which is a good thing. I like/hate it.

I want them to be able to factor without it.

Here are some things I am thinking of changing for next year:

1.  Fewer methods:  Reduce the number of factoring strategies, so students have less to sort through. I am thinking I could teach trinomials with ax^2 first, and then apply that method to trinomials where a=1. Students should be able to adapt to the simpler situation, and they'll have one less method to remember.

2.  Figure out how to connect the type of polynomial with the name of the method and how that method is completed:  I am currently expecting students to see a trinomial, then identify that it has a leading coefficient, then recognize that they should use the "airplane" method, and then remember how to do the airplane method. So complicated! It is kind of amazing that any of them can do this at all.

One of my students pointed out that the arrows I am drawing for the "airplane" method resemble a trident. What if I renamed the "airplane" method the "trident" method? That seems like a better connection between the original expression and what you do with it. (Trinomial = Trident method?).

3.  School-wide consistency:  There are only three math teachers in our school. Why haven't we done this already? No idea. We definitely need to get together and agree on an approach to factoring so that students aren't seeing a completely new process from year to year.

4.  Find a hook:  I haven't figured out how to motivate factoring beyond, "You are going to need to use this all kinds of ways later this year and next year".

All things to keep in mind for next time . . .

Unless . . . Is there a magic factoring wand that I don't know about?

Airplane Method for Factoring

I mentioned the "airplane" method for factoring in a recent post. Someone asked me what that was, so I thought I'd share.

I have seen a lot of methods for factoring a quadratic with a leading coefficient. Out of the ones I've tried, this is my favorite. The analogy to an airplane is a bit of a stretch, but students seem to remember it pretty well. So I'll take it.

I should also mention that, before I show this to students, I always spend some time letting them work on these by trial and error. I figure a process like this is worthless if they don't actually understand what they are doing. Once I feel like students understand the concept but they are still struggling to get every problem to work, I show them this. We treat it like a shortcut, and boy do they appreciate it!

Here is an example:

First, my students know they will need two binomials, so I start with two sets of parenthesis. Then I put the leading coefficient in each parenthesis. Hopefully, the students have a problem with this. We talk about why it is a problem, and I promise them that we will get rid of the extra 2 before we're all done.


Then, multiply a and c. (See the airplane wings? Use your imagination.)


Look for two numbers with product ac and sum b. (Propeller?  I know this is really a stretch.)


Put those numbers in the parenthesis.


Divide the extra 2. (The landing? Maybe.) It is pretty cheesy, but when students are having trouble I can say something like "you forgot the landing", and they know what I mean.

Done.


For something like this, you may need to divide both binomials. I point out how dividing by 3 and by 2 is the same as dividing by 6. We just choose the division that will keep integers.

Happy factoring!

Figuring Out Factoring

I have been thinking a lot about factoring lately. My algebra 2 students really struggle with it, and we have only factored quadratics (no sum/difference of cubes or grouping yet). I am worried because our first unit after winter break is rational expressions/equations. This unit is challenging when you CAN factor well, and almost impossible if you can't.

I am sure it will be necessary to take a few days to work on factoring before we start rationals. I need to review quadratics, teach cubes and grouping, and put them all together. I am working on how to structure that.

I have been doing some reading and searching for ideas. It seems that almost every method out there requires students to memorize some sort of process. (Except for this, and I am not sure my students are ready for that). As far as algorithms go, I am happy with what I've been using.

There are two issues that I want to address:

1. Helping students make a connection between what they SEE (trinomial, difference of squares, four terms, cubes, etc.) and what they DO (write two binomials using your preferred method, grouping, use a formula, or whatever).

2. Helping students get through problems where more than one method is required. (Like factoring out a GCF and then factoring the trinomial, or using grouping and then recognizing that one of the binomials is a difference of squares).

Here is a flow-chart I sketched out this morning:


I am picturing this on the white board, with an answer box next to it. You could 'drop' a polynomial into the top box and it comes out factored. If there was a GCF, you could put it in the answer box and then examine the remaining part and possibly drop it into another box. You could then take the pieces that come out of the second box and either add them to the answer box or drop them into another box. This all seems a little elementary, but I want it to be very obvious and very clear . . .

I am still refining this and hope to use it for the beginning of second semester. I will write about the final product. In the mean time, suggestions welcome. :)

Fraction Exponents. Easy.

Have you ever found yourself teaching a certain thing a certain way for years, and then one day you think about changing your explanation just a teeny tiny bit? And the new way makes infinite more sense to students, and the thing that used to be impossibly hard is now easy? And then you wonder what took you so long to find that more easy/obvious way of explaining something?

That happened to me today with fractions as exponents.

I won't bother to mention how I used to teach it. It was bad. Very bad.

Today, I started by showing them this, and they all shouted several people went "x squared!".


Then I asked them HOW they knew it was x squared. Somebody pointed out that three x-squareds multiply to equal x^6. Someone else said that you divide 6 by 3.

I made a big deal about writing x^(6/3) before writing the answer as x squared. And we did several more of these including some square roots, so they could see that you divide by two.


Then I showed them this, and gave some time to think about it and write down what they thought the answer should be.


Almost every single student wrote down x^(2/3)! And there were angels singing.

Then we worked on going backwards, which was no biggie at all.  Given x^(1/2), students could easily rewrite as square root of x and so on.

And then I didn't know what to do, because it used to take me a full class period to teach that. And some students would still be sitting there going, "Huh?". But today they just got it in, like, five minutes.

I realize that there is nothing earth-shattering about this method. The thing is, I've taught it this way before. Only I didn't lead with this part. I ended with this part. All I did today was change the order.

Oh, I love these moments of finding the tiniest little change that makes a huge difference.

Sorting Out Quadratic Methods

Now that my students can solve quadratics in five different ways, I wanted them to weigh the pros and cons of each method. I wanted them to be able to look at a quadratic equation and choose an efficient method for solving. Maybe it is just me, but watching someone pull out the quadratic formula when the equation can be factored kinda makes me cringe. I also wanted to review all the methods at the same time.

First, I gave them this sheet. It has the bell work and the practice problems.

For bell work, students worked out an example of each method in the first column as a review. Then we had a class discussion about the strengths and weaknesses of each method. We talked about how factoring may be the shortest method, but you can only use it if the quadratic isn't prime. And so on. We also talked about why you might choose one method over another. (Like how complete the square is so much nicer when the coefficient of x-squared is one and the coefficient of x is even.)


Next, I gave them this set of 16 cards* and a piece of card stock divided into four sections. I told them to try to put exactly four quadratic equations in each section. They needed to choose carefully, because next they will use that method to solve that problem. I just walked around and coached them a bit as they worked, and mostly I heard some good discussions going on. A few groups struggled, mostly because they had trouble figuring out how to tell if the equation could be factored or not. That is one problem I was hoping to correct with this activity, and it was pretty easy to identify who needed some help with that.

Then, students worked out the practice problems using the method they chose.

The next day I used a similar set of four quadratic equations for a quiz. Students could solve using any method they chose, but they could get bonus points for using each method only once. Students did fabulously with this. Yay!

*I also put the 16 problems on the practice sheet. Whenever I do an activity like this, I try to create the sheet so that someone who was absent could so something similar outside of class.

Color Coding: For Sketching Piecewise

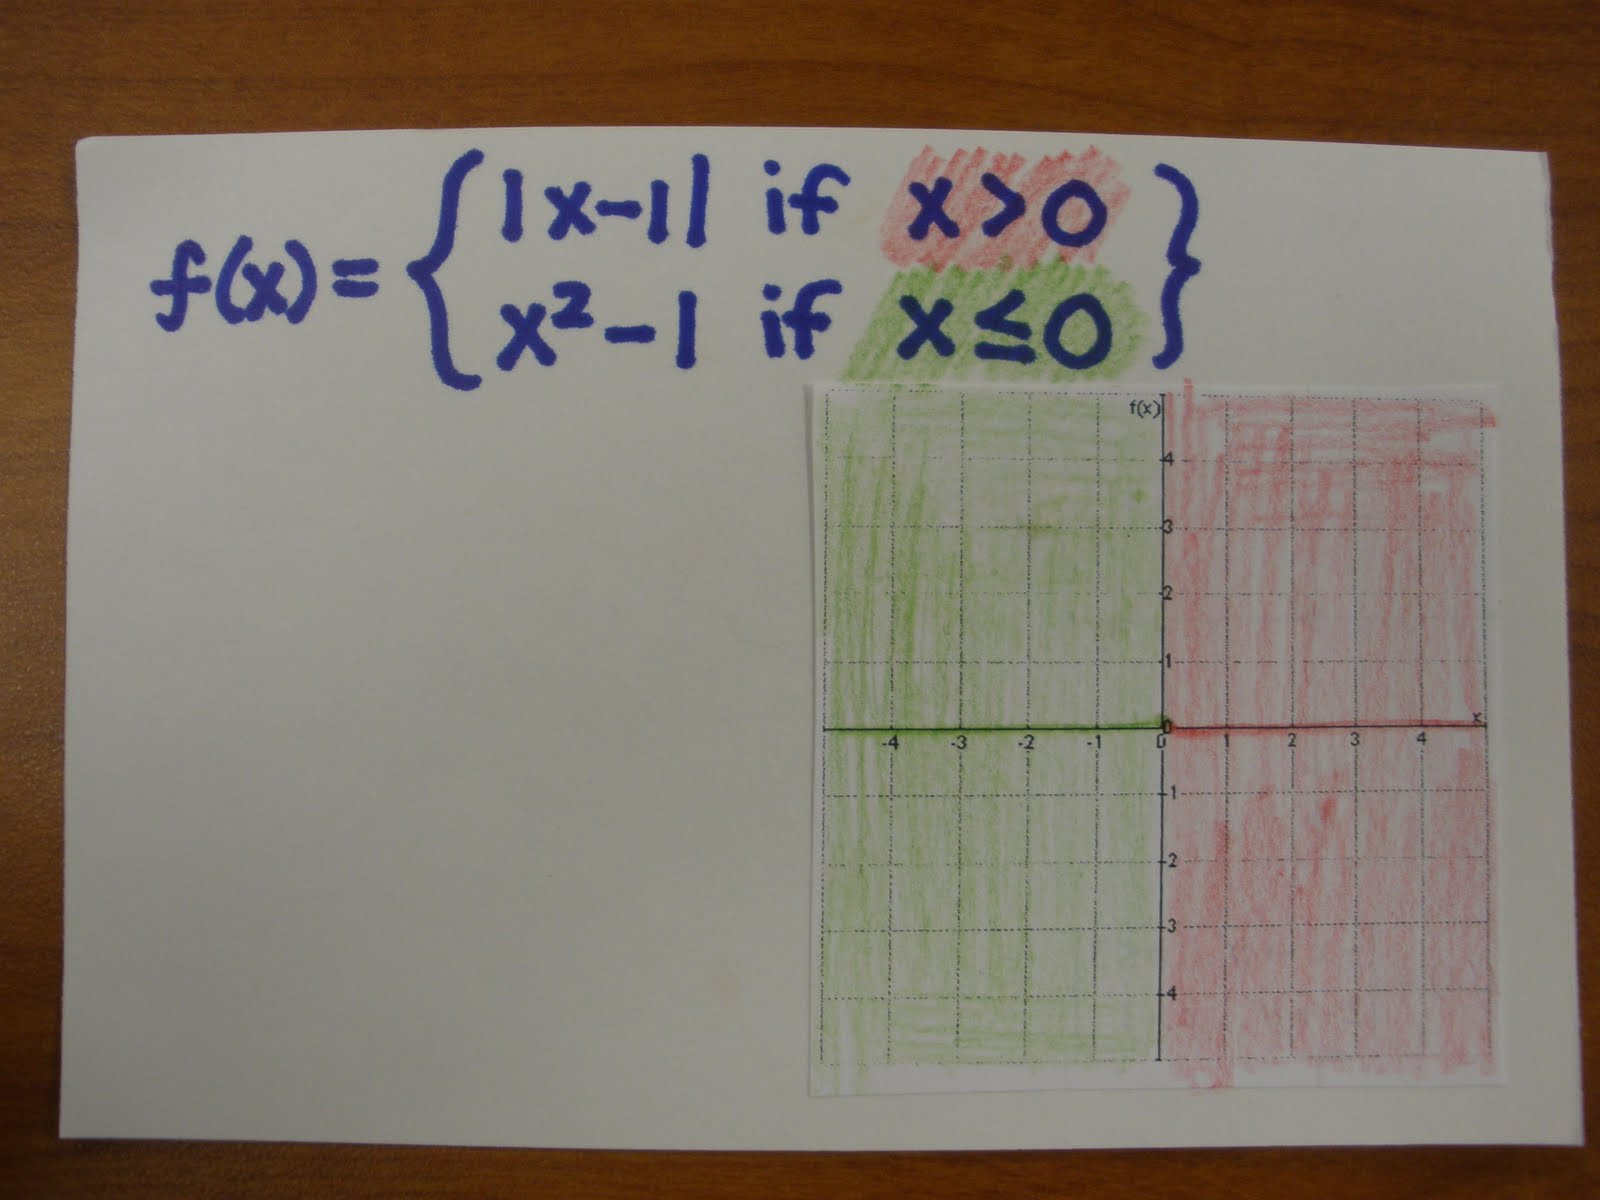
I tried a new (for me) approach for introducing piecewise functions in my Algebra 2 class, and it went over pretty well.  There is nothing really earth-shattering about this method, but it does involve color-coding -- and that is totally on my list of favorite things!

First of all, I am using only basic parent functions and their transformations that my students are already familiar with (linear, quadratic, and absolute value).  They do not need to plot points, because they already know how to sketch these graphs. I spent some time reviewing these before the lesson.

I start out with the idea of a restricted domain.  Students sketch the function, using the entire coordinate plane . . .


Then we worry about this "if" that comes after the function. Students color the restricted domain, and the corresponding portion of the x-axis.


Then they draw vertical lines to enclose the restricted area and shade it in completely.


And then they erase everything that is not in the restricted area.


We practiced these for a while before moving on to piecewise.

For piecewise, we shaded each restricted domain with a different color. Then shade in the corresponding restricted areas.

By the time we reached this point, most students could draw the graphs within the restricted areas without drawing the entire graph and erasing.


I've taught this lesson before, but pairing it with colored pencils was a first for me. I am pretty happy with the results, especially considering that a bunch of them are *DONE* and have started to shut down for summer.

Secret to motivating students this time of year, anyone?

Or, to get everyone to at least bring a pencil?

Conic Card Follow-Up

Recently, I wrote about my affection for Cindy Johnson's Conic Cards. I thought I would mention, like anything else stolen borrowed, I have added a few things to make it my own.

(This probably won't make any sense unless you have read that post.)

1.  Extra time:  I have found that following Cindy's outline, I ended up with 5-10 minutes left at the end of my 50 minute class periods. So I would put up an equation for whatever conic(s) they had learned so far and ask students to discuss with their partners to identify the vertex, center, major/minor axis, or whatever. Then I would randomly pick a color and have the students who worked with that color of cards that day answer the question. Since everyone knows they may be called on, they all talk to their partner and make sure they know the answer.

2.  Giving directions:  I found that it was really hard to give directions while students had cards in their hands. I didn't feel like they were listening because of all the sorting. Then again, I WANT them to be sorting. Instead of fighting it, I wrote out some directions (per Cindy's outline) so that they could go through at their own pace. I stopped them at a few points to write something down, but mostly they were able to figure things out on their own. Here are those sheets:

Parabolas (practice at the end is Cindy's)
Circles (practice at the end is Cindy's)
Ellipses (I combined Day 3 and Day 4 from Cindy's outline)
Sketch Parabolas, Circles, Ellipses
Hyperbolas

3.  Green Globs:  This is some software our school has purchased, and we like it. For conics, students type an equation to try to match a graph that is given. If they are correct, they advance to the next level. If not, they can see the graph of their incorrect guess so that they can figure out what adjustments to make. Games for linear equations are also included.

Crazy for Conic Cards!

I just finished another one of my favorite units: Conic Sections! I used to hate them, but now I love them (and so do my students). And it is all thanks to Cindy Johnson for sharing her conic section cards at an NCTM conference a few years ago. Her cards did more than enhance my unit on conics, they completely revolutionized the way that I teach this particular topic! Students learn by identifying patterns, not laboring over tedious formulas. Learning conics has never been so fun and painless.

Here is the basic idea:  You have a bunch of decks of cards (hopefully, you have a student aide to copy, laminate, and cut them for you). Each deck contains 20 equation cards (5 for each conic), 20 information cards, and 20 graph cards.  They are corresponding so that students can match each equation to its information and graph.  There are also four title cards (with the words Parabola, Circle, Ellipse, and Hyperbola) and eight formula/reference cards (with all the a's, b's, h's, and k's explained).


Each day students learn the characteristics of a new conic. Then they separate, sort, and match the corresponding cards. Each deck is different, so they work with different cards each day. One of my students says to me, "I love this, I wish we could learn all our math with decks of cards".


Each card has a letter, number, or symbol in the corner. There is a key for each deck so you can check for correctness at a glance.


At the end of the investigation (which takes 6-8 days), students can identify conics along with their vertices, opening, center, radius, major/minor axes, and asymptotes. And they can sketch them.

I don't go into any more depth than that at the Algebra 2 level. I think advanced students could do the matching more quickly, and you could follow up with some more in-depth study of all the formulas for the formulas. At our school, I leave that to the Precalc teacher.

I have had some contact with Cindy since NCTM, and recently I asked about her policy for sharing the cards. I have no desire to take credit for Cindy's great idea, I just want to help spread it far and wide so that others can benefit the way my students and I have. She said I could share her email, so here it is. You can send her a note to request the Conic Card files. Thanks a million times, Cindy!


Update August 1, 2014:  Cindy's cards are now available on google drive!

Also, I am linking a follow-up post.

How High is the Ceiling?

I wanted a right-triangle solving activity for my basic trig unit in Algebra 2. Students are learning how to find sohcahtoa using different types of information, and how to solve right triangles. We also do a bunch of practice questions, similar to what they'll see on the ACT.

Don't know where, but I remembered seeing this angle-measuring device where you could point at the top of a tall object and pull the trigger and it would tell you the angle of elevation. Then you can solve the right triangle and figure out the height of the object.

I made my own using items from around my classroom. I was super proud of myself.


Supplies needed:  Note card, drinking straw, tape, string, paper clip, and paper protractor.

For the lesson, I projected the picture below. I gave the students some time to look at the picture and to discuss what measurements they would need to solve for the height of the ceiling.


I put them in groups of four and gave them this handout**, a tape measure, and a high-tech angle-measuring device* of their own. They were supposed to start with the height of the ceiling in our classroom and check with me. After approving their process, I sent them out to measure ceiling heights in different rooms around the school.

When they returned to the room, I had posted the actual heights of these ceilings. I was inspired by dy/dan to contact the architects for this information, and I was pleasantly surprised by how quickly they responded and how enthusiastic they were to help out.

Everything went pretty smoothly, but answers were not as close to the actual as I had hoped. A few groups were very close, others as much as 4 feet too short. That gave an opportunity to talk about what changes could be made to achieve better results. Overall I was happy with this activity.


*Prior to posting this, I did a little research and found out this thing is called a clinometer. Then I did a google image search and found a bunch of pictures just like the thing I created. Embarrassing. My husband (Mr. iEverything) found that there is also an "app" for that.


**Definition of "Cafegymatorium", from the handout:  When your school is destroyed by a tornado, this is the room you use as a cafeteria, gym, and auditorium in one. The name has stuck, even though we have a new school now with separate areas for each. :)

Scavenger Hunts to Share

Here are two scavenger hunts I've used in my classroom:

1.  Proportion Scavenger Hunt. For Kansas tested standard 1.3.A1, adjusting estimates, we teach students to solve by setting up a proportion. This is meant to correspond with that standard, but I think it would be a great activity for anyone teaching students to set up proportions from a written description.

This is posted by permission from the authors, Paula Miller and Kelly Hughes, from Arkansas City High School. I have been trying to persuade them to write their own blog, but no luck yet. Thanks for letting me share your activity with the world (or at least, with the 5 people who read my blog). You guys rock!

2.  SOHCAHTOA Scavenger Hunt. This one was hand-written by my 18-year-old student intern. It includes finding sohcahtoa given different types of information. There are degrees and radians, angles larger than 90, special triangles, and some unit circle questions.

My intern seemed pretty excited when I asked him about posting it here. If you find this to be helpful at all, or if you have any suggestions for him, would you leave a comment? Our vocational program is working with his future college to try and get him some credit for his pre-college/pre-teaching experience.

Logarithm Love

I just finished what was maybe my favorite unit ever! Logs and exponents . . . My students struggle with it every year. I get questions like "When are we ever going to use this?", and "Who had so much time on their hands to think this stuff up?" Translation, "Not only do I not understand this stuff, I don't understand the point of learning it". This unit was at the top of my list for improvements this year.

It seemed like the scores were higher than what I usually see for this test. To compare, I looked up the scores from last year's test. This year's class average was 4% higher than last year's. I know I am comparing two different groups of students, but this year's class has struggled more overall than last year's class. I feel like my improvements made a difference. So what did I do differently?

Time: I am lucky enough to have some flexibility in what I decide to teach and how much time I spend teaching it. So, I let myself take a couple of days for reinforcement instead of teaching something new every day. That really has me thinking about my course as a whole. I want to look for ways that I can go deeper with fewer topics for next year.


Accessories! This unit was interwoven with a ton of fun. I used my own log & exponent dominoes (shared below), Log Flash Cards, and Stations Review. I also used f(t)'s Add Em Up and Log War. It is like you take a basic t-shirt and some jeans, then you add a fun necklace, a cute jacket, and the perfect pair of shoes. Yes, I just compared math to fashion! What I mean is -- these activities made the unit more attractive and engaging for students. And they also completed the unit by providing extra practice and reinforcement in fun ways. That seemed to also bring a deeper level of understanding. If I had unlimited time, I would make a ton of these types of things and use them more often.

Still room for improvement:  Students consistently did poorly on any question where they had to use properties for logs. I want to find a better way to teach that next year.
Log and Exponent Dominoes

Super Speedy Quiztastic Fun

A couple weeks ago, I did a trial run of Kate Nowak's speed dating. It was a great way to set students up for coaching each other, and students love the social aspect of the activity.

That got me thinking of a faster version, for practice of basic skills at "lightning speed". I am thinking it could work for identifying properties, factoring a quadratic where a = 1, or anything that is not so paper-and-pencil problem solve-y and more flash card-y. I tried it with converting logs to exponential form, and for evaluating logs.

For the fast version, students stand in two rows facing each other. Everybody has a flash card with the answer on the back. Students quiz the person facing them, and provide coaching as needed. We talked about what appropriate coaching (helpful hints) looks like vs. inappropriate coaching (name-calling, answer telling, etc.). Then, students trade cards and one row moves so that everyone has a new partner and a new question.  I ended up rotating every 15-20 seconds. It worked great, students got reinforcement on these concepts, and the whole activity took less than five minutes.


As a warm-up, I used one set of cards (the 1st and 3rd pages front/back from the document below) for converting logs to exponential form. I made them so that if you copy them front-to-back, then the right answer is on the back of the right card. At least, that was the goal. (I wish I had included some with negative exponents). Then we moved on to another set of cards (2nd and 4th pages), where they had to identify what number goes in place of the '?'.

log flash cards


And, I have to mention, the beauty of the moment when I had this on my board as part of that same lesson:  (When will my brand new fantabulous technology cart function properly??)


No one asked me who had too much time on their hands and thought this stuff up.  No one asked me why they have to learn this stuff.  They just got it.  And they came to class the next day asking if today's math would be as easy as yesterday's.

Thanks (AGAIN!) to Kate for suggesting the use of the word "power" before "log".

The Loop for Logs

A few years ago, when I was introducing logs, I drew some arrows like this:


I wanted to show that this base here goes with this exponent over there which goes with this answer over here . . .

Then I noticed one of my students drawing a loop on all of his papers, like this:


He said it helped him remember the order, especially for when one of the terms was a variable.  This has turned out to be a pretty helpful mnemonic device for changing logs to exponential form.

This year, when my calc students (who were also in my algebra 2 class) encountered a log, I just reminded them of the loop and they were like "Oh yeah, the loop."
Older Post ►
 

Copyright 2011 teach math blog is proudly powered by blogger.com